Drip Coffee Guide: 5 Simple Steps for Perfect Brewing
Welcome to the ultimate drip coffee guide. The humble drip coffee maker sits in millions of kitchens worldwide. Yet most of us use it wrong. If your coffee tastes bitter, weak, or just plain “meh,” it’s not the machine—it’s the method. This drip coffee guide shows you exactly how to brew perfect drip coffee every time. Making great drip coffee is easier than you think. It requires focusing on three key variables. Forget complicated techniques. We’ll cover everything from bean selection to brewing. Additionally, we’ll share pro-tips that elevate your morning cup. Therefore, let’s start your journey to better coffee today.
The “Golden Ratio”: How Much Coffee for How Much Water?
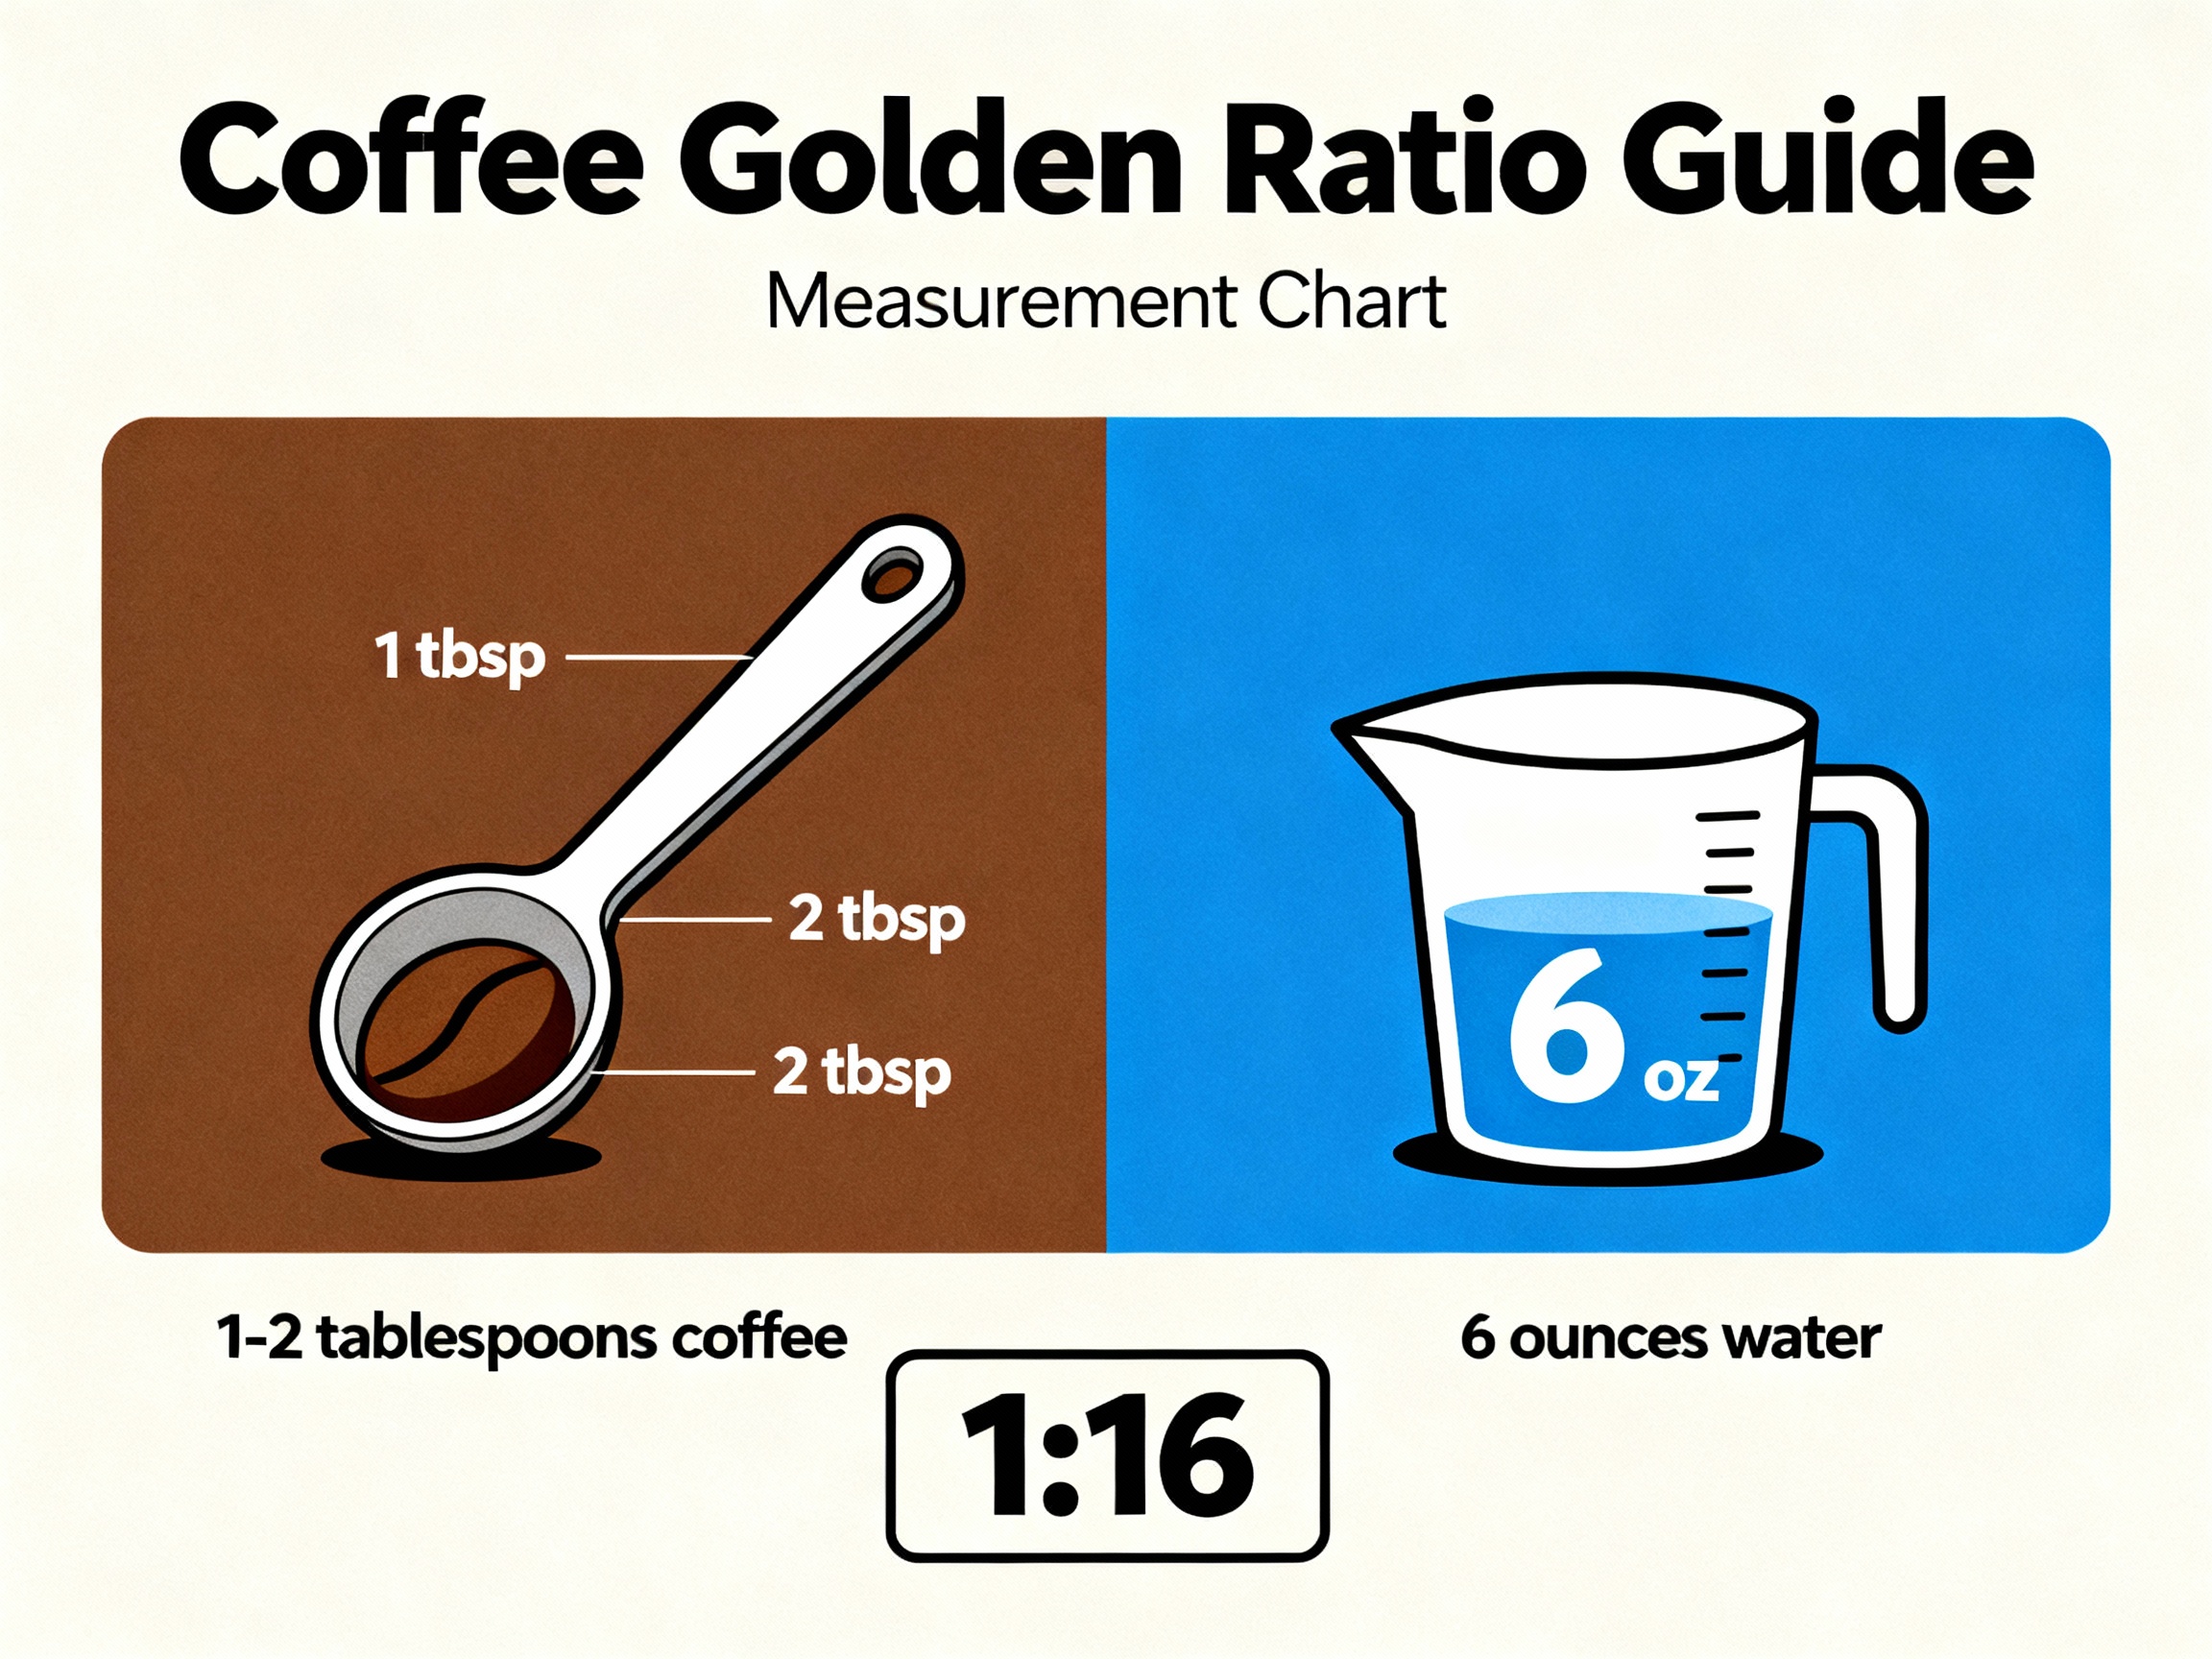
The foundation of great drip coffee is getting the ratio right. Most people guess when making drip coffee. That’s your first mistake. Basically, following a simple rule ensures consistency. Therefore, your coffee tastes great every time. The 1:16 ratio is the golden standard used by specialty coffee shops worldwide for optimal extraction and flavor.
The Easy Rule of Thumb
Use 1 to 2 tablespoons of ground coffee for every 6 ounces of water. Additionally, this works for most home brewers. Most importantly, it’s easy to remember. Start with 1.5 tablespoons and adjust to taste. First, try this ratio. Next, taste your brew. Subsequently, adjust if needed. When making drip coffee this way, consistency improves dramatically.
The Enthusiast’s Approach (By Weight)
For consistency and precision, use a 1:16 ratio. This means 1 gram of coffee to 16 grams of water. Additionally, you’ll need a kitchen scale. Most importantly, this method produces incredible results. Therefore, coffee enthusiasts making drip coffee use this method. Furthermore, it’s worth the small investment.
| Method | Coffee Amount | Water Amount | Best For |
|---|---|---|---|
| Rule of Thumb | 1-2 tablespoons | 6 ounces | Quick brewing |
| By Weight (1:16) | 1 gram | 16 grams | Perfect precision |
The Gear You Need
Quality gear matters when making drip coffee. You don’t need expensive equipment. Additionally, you need the right equipment. Most importantly, these four items transform your drip coffee experience.
It all starts with the machine. A brewer that reaches the right temperature (195-205°F) is crucial. Most home brewers don’t maintain proper heat. Additionally, cheaper models heat inconsistently. Therefore, temperature matters enormously. According to the Specialty Coffee Association, water temperature between 195-205°F is the industry standard for optimal extraction. If you’re looking for an upgrade, see our guide to the best drip coffee makers.
This is the most important tool for making drip coffee. Pre-ground coffee is stale. Additionally, stale coffee tastes flat. A burr grinder gives you consistent grind. Most importantly, consistent grind means even extraction. Therefore, flavor improves dramatically. We tested the top models in our best coffee grinders review.
Your coffee is 98% water. If your tap water tastes bad, so will your coffee. Additionally, chlorine and minerals affect taste. Therefore, use filtered water for making drip coffee. Most importantly, this makes an instant difference. Furthermore, your machine stays cleaner longer.
Look for beans with a “roasted on” date. Additionally, avoid bags with only an expiry date. Freshness is absolutely key when making drip coffee. Most importantly, buy whole beans. Furthermore, grind immediately before brewing. Therefore, flavor stays vibrant and alive.
How to Make Drip Coffee: The 5 Simple Steps
Step 1: Measure Your Beans
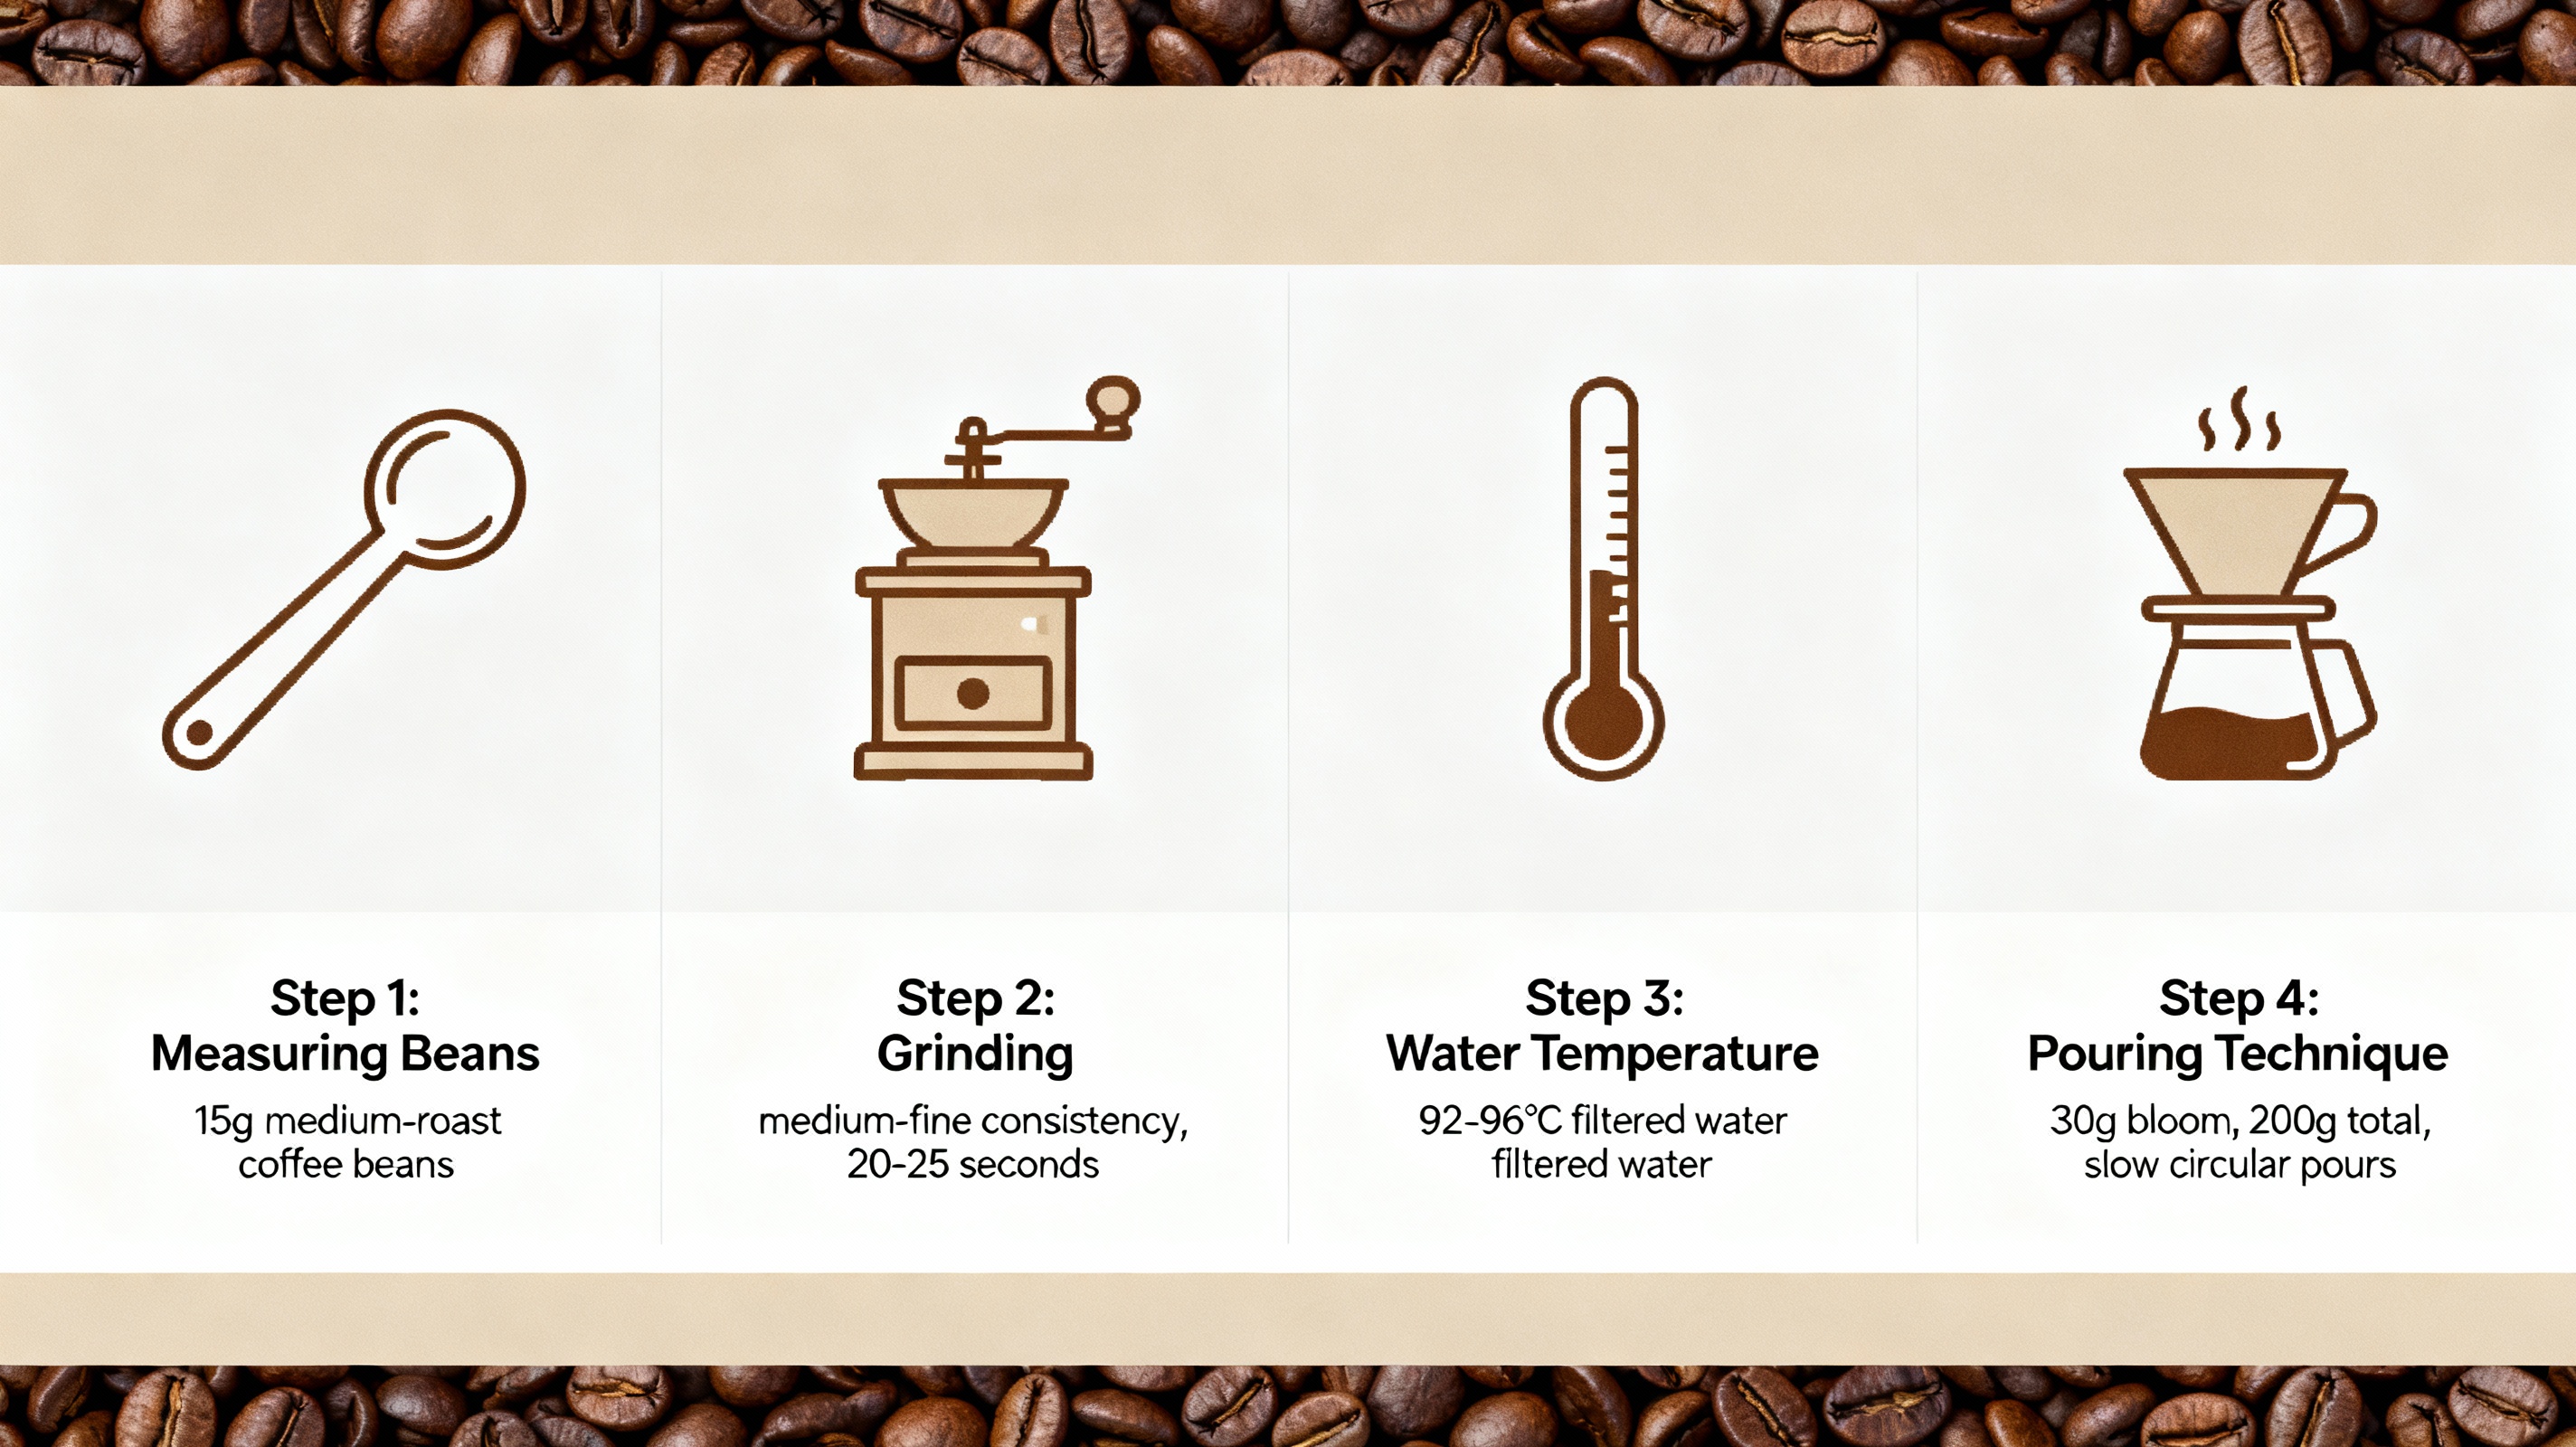
Pull out your scale or measuring spoon. First, decide how much coffee you want to brew. Next, use the Golden Ratio mentioned earlier. Subsequently, measure your beans precisely. Most importantly, accuracy here pays off in your cup. Therefore, don’t eyeball this step when making drip coffee.
Step 2: Grind Your Beans
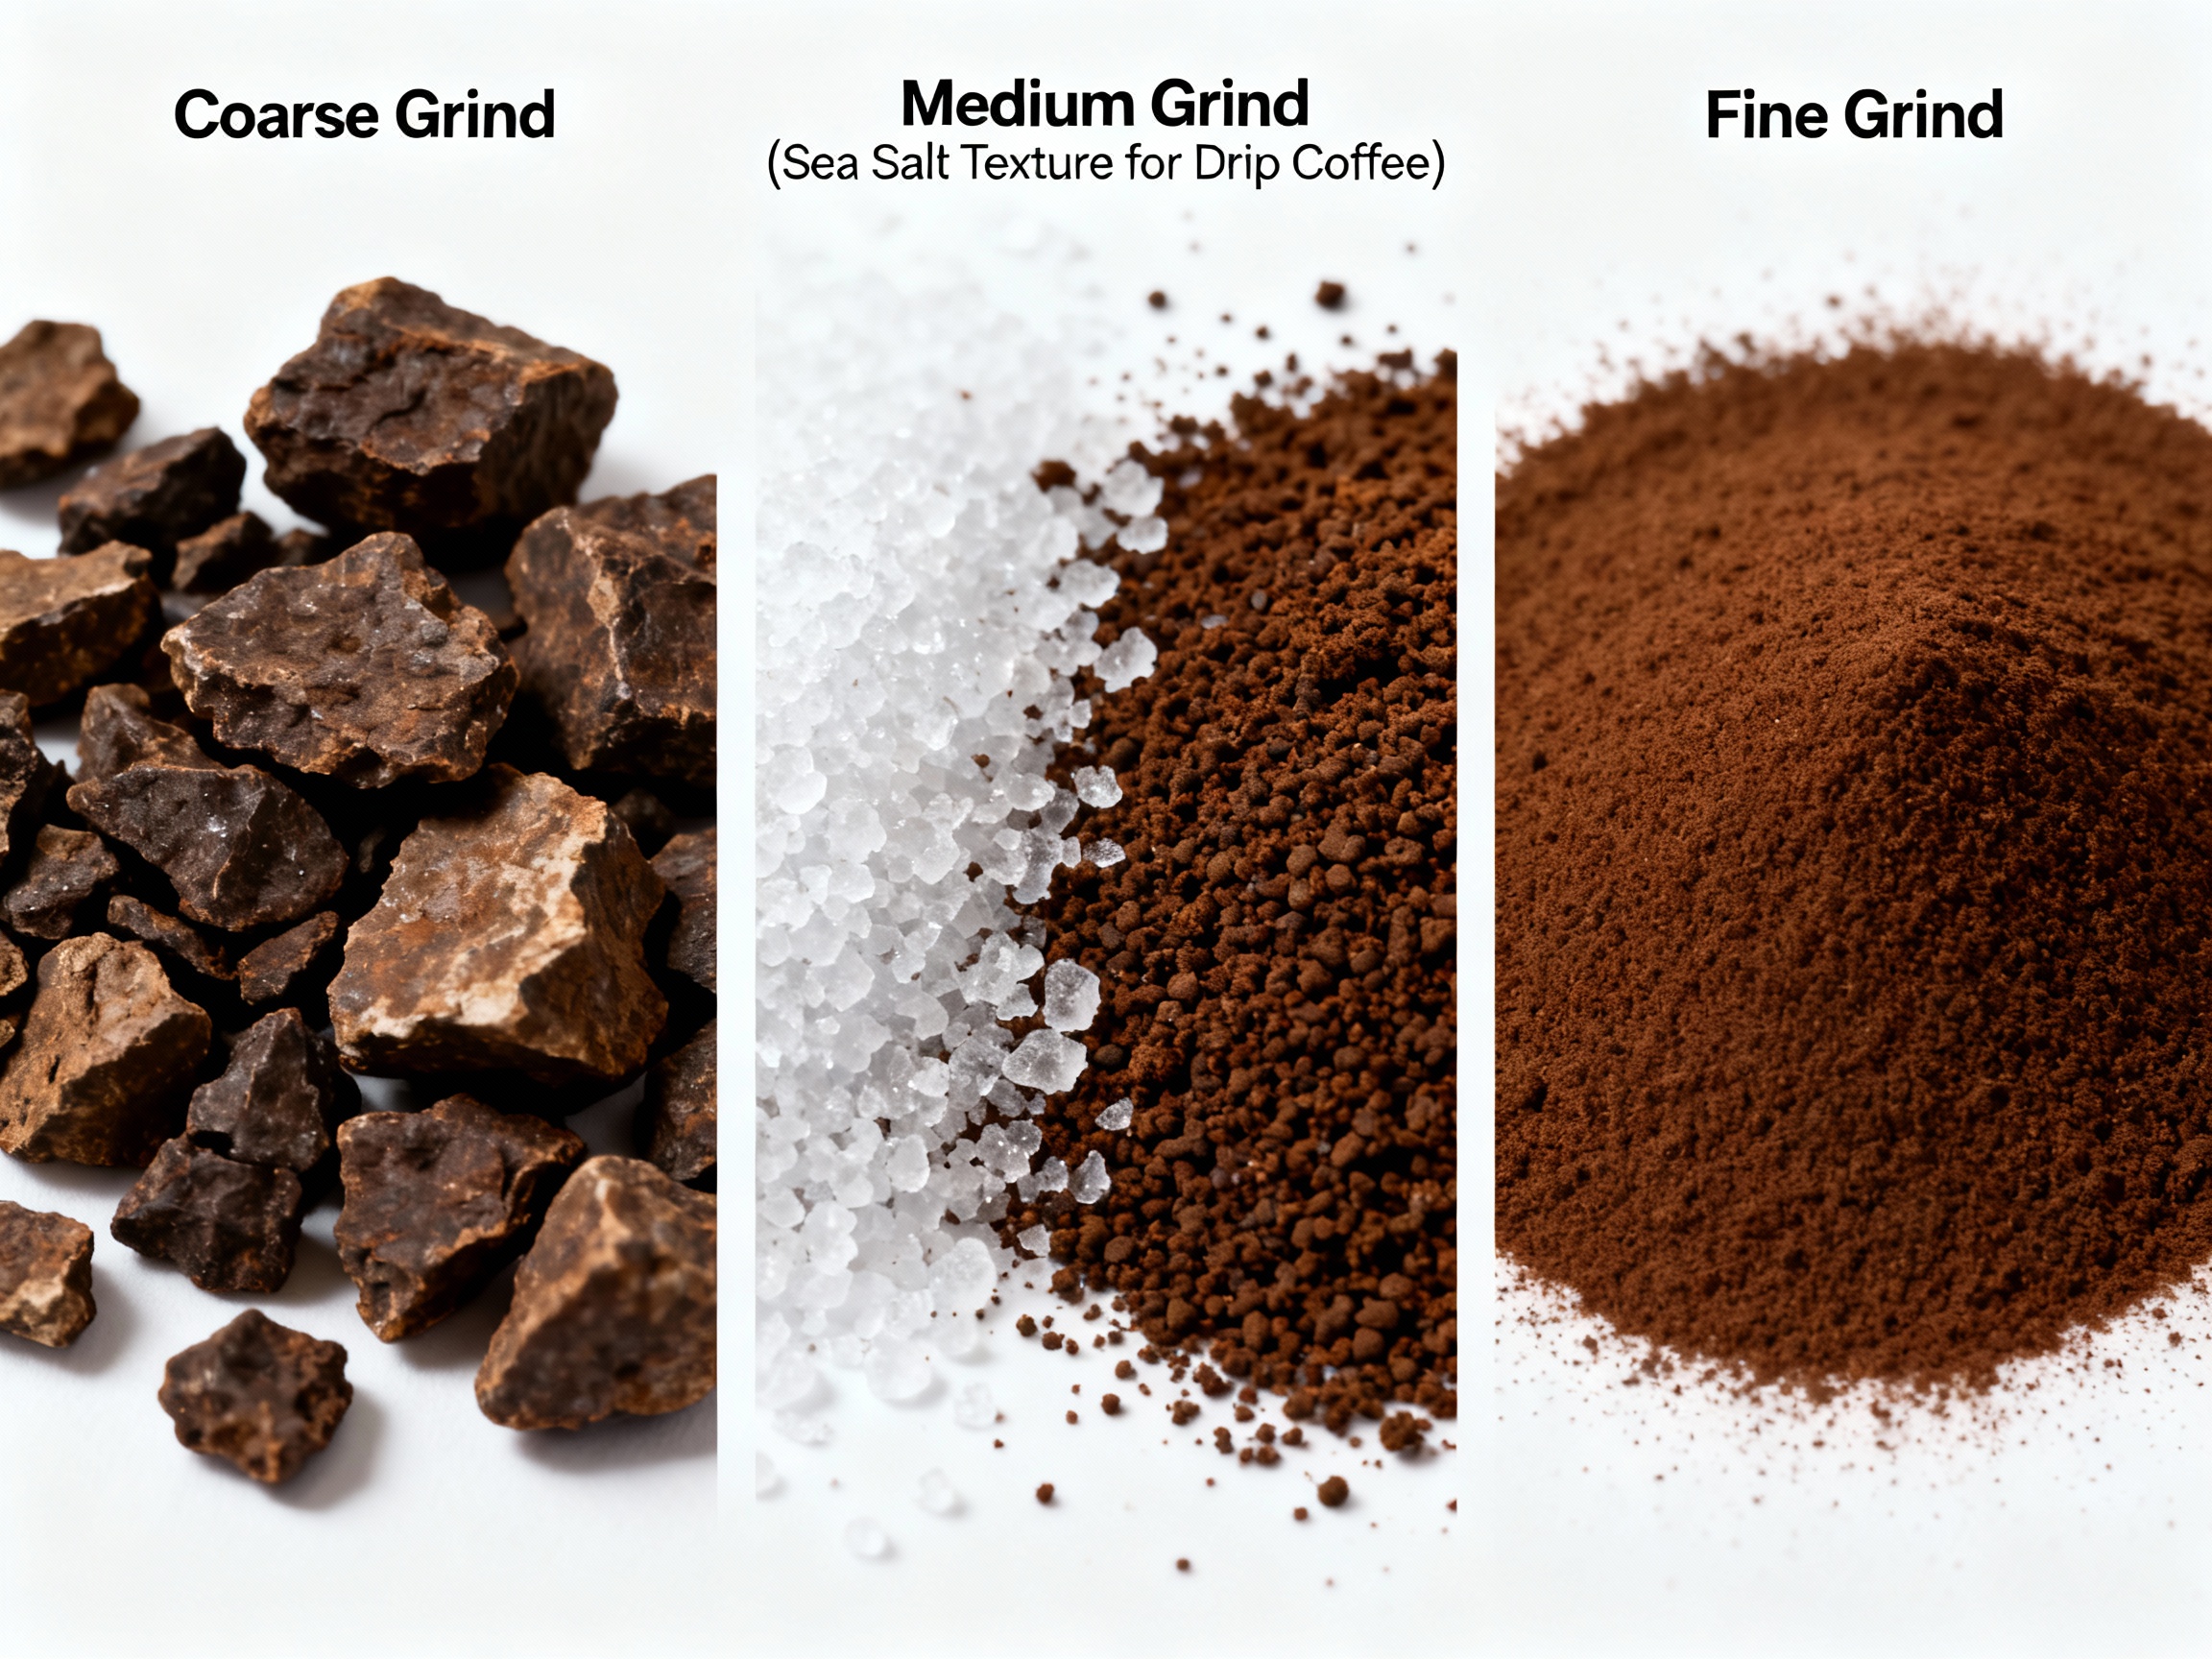
Grind your beans to a medium size. Basically, the grind should resemble sea salt. Not powder. Not chunks. Most importantly, consistency matters here. Additionally, use a burr grinder. Therefore, you get uniform particle size. Furthermore, this ensures even extraction for the best drip coffee.
Step 3: Prepare Your Machine
Add filtered water to the reservoir. Next, place a paper filter in the basket. Subsequently, rinse the filter with hot water. Most importantly, rinsing removes paper particles. Additionally, it preheats the brewer. Therefore, your drip coffee starts strong.
Step 4: Add Grounds and Brew
Add your measured, ground coffee to the filter. Next, level the coffee bed gently. Subsequently, place your cup or carafe underneath. Finally, press the start button. Most importantly, watch the first drops fall. Additionally, listen to the brewing sounds. Therefore, you know it’s working when making drip coffee.
Step 5: Serve Immediately
Your coffee is ready once brewing stops. Most importantly, serve it right away. Additionally, don’t let it sit on the hot plate. Furthermore, sitting on heat makes coffee bitter. Therefore, pour and drink while fresh. Most importantly, enjoy every sip of your drip coffee.
3 Pro-Tips for a Better Brew
Tip 1: “Bloom” Your Coffee (If Your Machine Has It)
Blooming means briefly wetting the grounds. Additionally, this releases CO2 from the beans. Most importantly, CO2 interferes with extraction. Therefore, blooming improves flavor. If your machine has a bloom setting, use it. Furthermore, it only takes 30 seconds. Basically, it’s worth doing for the best drip coffee.
Tip 2: Use Quality Paper Filters
White, bleached filters are superior. Additionally, they prevent papery taste. Most importantly, they trap oils better. Therefore, your coffee tastes cleaner. Furthermore, unbleached filters can add unwanted flavor. Basically, spend a dollar more on good filters. Therefore, your drip coffee improves immediately.
Tip 3: Clean Your Machine Regularly
Mineral buildup happens over time. Additionally, it clogs your machine. Most importantly, it affects taste and performance of your drip coffee maker. Therefore, descale your brewer monthly. For the best results, follow manufacturer guidelines and remove mineral deposits regularly. Furthermore, descaling takes 20 minutes. Basically, it extends your machine’s life. Therefore, do this maintenance step.
Final Thoughts
Making perfect drip coffee comes down to three factors. First, fresh, evenly-ground beans from a quality grinder. Next, the correct ratio of coffee to water. Finally, a machine that maintains proper temperature. Most importantly, these three elements work together. Additionally, master these basics and you’re unstoppable. Therefore, focus on fundamentals when making drip coffee. Moreover, forget complicated tricks. Basically, consistency beats complexity. Furthermore, practice breeds excellence. Most importantly, each cup improves with these principles. Therefore, you’re ready to brew the best cup of drip coffee you’ve ever had at home. Subsequently, your mornings transform. Additionally, your coffee improves dramatically. Therefore, start making drip coffee using this guide today.
Ready to Upgrade Your Drip Coffee Game?
Master these techniques and transform your morning routine. Additionally, pair them with quality gear for even better results. Therefore, explore our guides to coffee makers and grinders. Most importantly, invest in your coffee ritual. Furthermore, you deserve great coffee every morning when making drip coffee.